Posts

Showing posts from May, 2016

Solve Potty-Training Problems

Image
3 keys to solve potty-training problems     1)     Patience.     2)     Perseverance.     3)     Positive Attitude. Examples of Potty Training problems: 1) “She Won't Go in the Potty”. "If your child has no desire to use the potty, chances are she's just not ready," says Ari Brown, MD, coauthor of  Toddler 411 (Windsor Peak Press).  First you should make sure that your child is ready for this step. Observe your child, make sure they show interest in the potty. Be attentive to your child’s needs, wanting to change the diaper, stops playing when their diaper is full. If you witness such actions, then throw that potty in and start teaching your child on it. If you don’t see such actions, then it may not be potty time just yet. 2) “My Child Only Uses the Potty When I Put Him on It”. It's normal for a child to depend on Mom's reminders in the early stages of potty training. After all, he's spent his whole life peeing and pooping

Psychology behind Thumb-sucking

Image
Have you ever wondered why a child thumb sucks? If there are any side effects to it? Deformation of the finger? Why it happens? The reason your toddler or child such their thumbs is because it’s the way of comforting themselves and it calms them down. It is very normal because even when the baby is in their mother’s womb they practice it too. The reason he/she might suck their thumb is related to being tired, scared, bored, sick. Another reason would be to fall asleep or makes him/ her go to sleep in the middle of the night. How to react to it? 1.    Don't worry.  According to the American Dental Association, they state that, “most children can safely suck their thumb – without damaging the alignment of their teeth or jaws – until their permanent teeth begin to appear.” They add “It's the intensity of the sucking and the tongue's thrust that deforms teeth and makes braces necessary later.” 2.    Observe your child's technique. If your child sucks h

ROAD TRIP GAMES & ACTIVITIES

Image
Did you ever wonder how you can make your road trip enjoyable for your child? No nagging and crying? No nagging means a road trip full of activities and fun. Examples of activities could be: ·          Make a map of your journey :  Create your trip map and track it with the kids.  You could add a “treasure map” component by rewarding checkpoints along your trip.  As you reach certain points they can get a toy/snack.  This teaches them map skills while also occupying them with toys and the anticipation of the destination.  ·          Photography on the Move:   Let them take pictures of what you are driving by with a digital camera. ·          Doctor on Call:   A Box of Band-Aids and a rubbing alcohol pad.  Let them play “Dr”.  ·           Catalog “Shopping”:   Toy magazines – these keep my kids entertained for hours.  You can even let them cut out pictures of the things they want and make a “wish list” collage with a couple glue sticks, if you are feeling adventurous. ·  

The Importance of Art and Creativity

Image
  Your children are known to be the little masters of the moment. They enjoy the feeling of paint on paper and the visual of seeing glitter. Why Art? You are helping your child in developing mentally, socially, and emotionally. Creating art may boost young children's ability to analyse and problem-solve in many ways. By counting pieces and  colors , they learn the basics of math. When children experiment with materials, they dabble in science. Art helps boost self-confidence. 6 Ways to Inspire Creativity: 1.    Prepare for a mess.  Create an art space for your child where your child can be messy. 2.    Avoid giving direction.   Instead of saying, "Paint a rainbow," encourage her to "experiment with mixing colours using different types of brushes and paper,". 3.    Speak specifically about art.   instead of giving a generic compliment, you can say you used a lot of black in your painting, why is that? 4.    Explore your child's pr

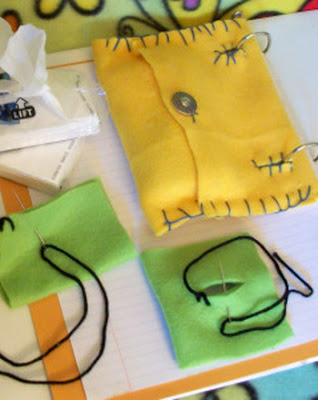
Tissue Pouch Activity

Image
What You Need: ·           7" x 12" piece of fleece fabric ·          Ruler ·          Marker ·          Transparent tape ·          Embroidery thread ·          Tapestry needle ·          1 large shank button ·          Scissors What You Do:    1)    Put the fabric on a smooth surface, long side visible. To enhance interactivity, help your child measure and draw a line down the fabric, 4 ½ inches in from the right edge.    2)    Help your child in folding the right edge, aligning the edge with the line already drawn.    3)    Draw a dot for the button near the edge. Help your child in sewing the button.    4)   Add tape to the folded edge. Next, fold the left edge over the right edge, so that it overlaps by ½ inch, and tape it down. Tell your child to mark the left edge over the button as shown below.        5)    Then mark two dots 4 inches away the left side of the cozy, in other words abo